kabocha squash red curry

pumpkin_curry_main

‘Tis the season for pumpkin everything – pies, lattes, breads, and pies. Here’s a recipe with a savory twist on everyone’s favorite gourd, a kabocha squash and sweet potato red curry. I was introduced to this recipe via Blue Apron, a meal delivery service that sends you all the fresh ingredients you need to make a scrumptious meal for two, a few weeks ago and it was so nice I made it twice!

ingredients_redcurry


Slightly modified from Blue Apron

2 tbs olive oil
6 cloves garlic, finely diced
2 stalks lemongrass, finely dice the soft white core of the stalk
1 cubanelle pepper, finely diced
1 kabocha squash, cubed
2 sweet potatoes, cubed
1 red onion
3 tbs red curry paste
1 can coconut milk

Condiments:
1 Bunch Cilantro
1 Bunch Mint
Limes

DSCN0086

DSCN0088

Will you look at that pumpkin/kabocha squash!

The beauty of how I made this recipe this time is that it’s pretty set it and forget it! I made it in a crock pot. Start by simmering your garlic, lemongrass, pepper, and onion in your crock pot on high heat until their soft and growingly translucent.

DSCN0091

DSCN0094

Add your squash and sweet potatoes and cook until their soft.

DSCN0095

Then add your coconut milk and curry paste and let your curry simmer until fragrant and ready to serve. I let mine hang in the crock pot for a few hours before serving over scoops of brown rice and garnished with cilantro, mint, and limes!

DSCN0097

Add a little spice to your life this decorative gourd season!

xo,

Julia

horchata

horchata

This HungryTexan is stubborn enough to try anything once, and this weekend I decided to try my hand at horchata – a milky latin beverage I’ve oft enjoyed at El Salvadorian restaurants. There are lots and lots of varieties of horchata made from combinations of almonds, rice, sesame seeds, barley or tigernuts. I tried an almond and rice-based varietal, and the final product was sweet and nutty with a pleasant creaminess that wasn’t overly rich. We sipped our horchata plain, but it would be a real treat frothed up in a latte or blended into a milkshake!

photo 1 (11)

Recipe slightly modified from Nosh On.It’s version:

1 cup raw, unsalted almonds
1/3 cup long-grain white rice
1 cinnamon stick
5 cups of water (3 hot, 2 cold)
1/2 cup simple syrup (1 cup sugar, 1/2 cup water, 1/4 tsp vanilla)

Beware! This is a two day project and requires a good night’s soak for the flavors to really sync. Start by blanching your almonds. Dump your almonds in boiling water for one minute and then strain & run under cold water. Blanching is key to being able to super simply pinch off the almond’s skin. Grab the almond at its fat part and pinch the skin away – they fly right off (literally, we had almonds fly across the kitchen!). Now you have a cup of naked almonds.

photo 2 (11)

Give them a nice toast in a completely dry skillet until they’re lightly browned.

Next, in your grinding instrument of choice (coffee grinder, spice grinder, food processor) pulverize your rice into a fine, fine powder.

photo 3 (6)

Then, in a large jar or jug combine 3 cups of hot water, your almonds, your rice powder and your cinnamon stick. Give it a good stir and let it cool to room temperature before refrigerating. After your mixture has had an ample soak, remove the cinnamon stick and blend everything together in a blender. Blend until your almond/rice mixture is very powdery. Add the extra two cups of cold water and continue blending.

Next comes the messy part. With a very fine mesh strainer and cheesecloth, strain your mixture. It’s slow going. Be patient! Strain it twice if you need to. Get out as much sediment as you can and then stir in your simple syrup. Pour into a glass and enjoy while listening to Vampire Weekend’s, Horchata.

Cheers,
Julia

Heirloom Tomato & Roasted Beet Gazpacho

This recipe is featured today in Luri & Wilma, a smart magazine for smart ladies run by native Texan Charlie Heck.  I love the way they shot and featured this recipe, and just as much, I love this Tomato & Beet Gazpacho!  Click through the article below to read the whole issue online (there’s great stuff about fashion, body issues, and vintage duds inside) and scroll down for the full recipe!

Gazpacho Luri Wilma


Heirloom Tomato & Beet Gazpacho

Aside from being the perfect make-ahead, quick-cleanup recipe, I love this gazpacho because it relies on fresh ingredients for a bright and complex flavor.  The raw veggies lend a subtle spice to the cold soup, and garden herbs leave it freshly flavored.   Red and golden beets impart a deep magenta hue while keeping the soup slightly sweet.  Plus, this silky staple requires zero cooking and limited utensils, so you can stay cool in the kitchen while impressing your guests with a light supper.  This recipe will serve two as a main course or four as an appetizer.

You’ll need:

  • 3 large heirloom tomatoes
  • ½ large cucumber, seeded
  • ½ red onion
  • 3 cloves garlic
  • 2 beets (try for a mix of red & golden)
  • Handful of fresh herbs: basil, parsley, lemon thyme, chives.
  • 3 tbs red wine vinegar
  • ¼ cup olive oil

First, finely dice the cucumber, red onion, and garlic.  Seed the tomatoes and dice them as well.  When it comes to tomatoes for this gazpacho, I opt for heirloom, but any blend of particularly juicy ones will do- Green Zebras and Brandywines are favorites.  Combine the vegetables in a large bowl and use an immersion blender to puree the veggies until smooth, adding the olive oil slowly.  To flavor the gazpacho, use any herbs you have on hand- I snipped a handful of basil, parsley, garlic chives, and lemon thyme from the window box.  Add 3 tablespoons of red wine vinegar, then cover the bowl and pop it in the refrigerator.

OLYMPUS DIGITAL CAMERA

OLYMPUS DIGITAL CAMERA

Because the flavors of this gazpacho intensify with time, I like to keep it in the fridge for up to two days, then strain it using a fine sieve when I’m ready for a quick weeknight dinner.  Of course, if you don’t want to strain the veggies, you’re welcome to serve it chunky, but I’m always impressed with silky soups.  Serve it up in bowls with roasted shrimp, a creamy burrata, or toasted ciabatta for a simple supper.

gazpacho

xoxo,

Liz of The Hungry Texans

garlicky broccoli slaw

Broccoli_Slaw

Last week I awoke to a bountiful produce delivery from From the Farmer on my doorstep. For any friends in the DC area, I couldn’t recommend From the Farmer more highly – they deliver fresh produce to your doorstep weekly. I love it because of the flexibility of From the Farmer vs. traditional CSAs or produce delivery services. I can suspend my deliveries if I know I’m traveling and won’t have time to put my produce to good use! This week my bin overflowed with peaches, heirloom tomatoes, peppers, baby eggplants, beets, broccoli, apples and more. I wanted a fresh and hearty salad, so whipped up this garlicky broccoli slaw with beets, apples, and almonds.

BrocSlaw_Ingredients

For the salad:
Three heads of broccoli
Two beets, peeled and diced
Two apples, skin on and diced
1/3 cup sliced raw almonds

For the dressing:
1/4 cup olive oil
4 cloves garlic
juice from half of one lemon
1 tsp apple cider vinegar
salt & pepper to taste

Start by roughly chopping your broccoli so it’s small enough to fit through the tube of your food processor. I used my the slicing disc attachment on my food processor to thinly slice the broccoli, but you could also use a mandolin or just roughly chop with a big chef’s knife.

Peel your beets and dice into bite-sized pieces. Dice your apple into similar sized cubes. In a large bowl combine broccoli, beets, and apples.

Mixture_slaw

Add your almonds.

Mixture_almonds

Next, make your dressing in the bowl of a food processor by combining garlic, olive oil, lemon juice, apple cider vinegar. Season with salt and pepper to taste. Drizzle over all ingredients and toss to combine.

DressedSlaw

Serve as a side or enjoy all on its own as a salad!

xo,
julia

brown butter, brown sugar cookies

Brown Butter Brown Sugar Cookies

It’s been so long since last we wrote, but these brown butter, brown sugar cookies are worth the wait. This Hungry Texan will occasionally make a quick detour on her bike to work and pop into Bean & Bite on 15th for a “treat yo self” iced coffee. Aside from their smooth and rich iced coffee the second biggest attraction is that they always have bite-sized samples of their sweet treats cut up in plates by the register. On two separate occasions I’ve been lucky enough to sneak a taste of their brown sugar cookies, and after taste number two I vowed to try my hand at recreating them. I took to my mixing bowl and this recipe triumphed. I’m a modest gal, but these are honest to everything the best cookies I’ve ever made.

Just thank me that I’m sharing this recipe as bathing suit season is waning.

Ingredients

Modified from Cook’s Illustrated’s Brown Sugar Cookie Recipe

1 3/4 sticks unsalted butter 14tablespoons unsalted butter (1 3/4 sticks)
1/4 cup white sugar
2 cups brown sugar (I used a mix of dark & light)
2 cups + 2 tbls flour
1/2 tsp baking soda
1/4 tsp baking powder
1/2 tsp table salt
1 egg
1 egg yolk
1 overflowing tbl vanilla

+ an additional 1/4 cup of each brown & white sugar for rolling

Start by preheating your oven 350º.

The secret to this recipe’s success is the brown butter – browning your butter gives it a dense, almost nutty flavor, that combined with salt and sugar becomes borderline carmel-ish. Start by melting all but 4 tbls of your butter in a pan at medium heat. Stir constantly until the butter begins to brown. Transfer to a container to cool and add the additional 4 tbls of butter to the warm butter. You may notice sediment-like solids forming in your brown butter, embrace them!

Brown Butter

Let your butter cool for about 15 minutes and then combine your butter and sugars.

IMG_1815

Add your egg, egg yolk, and vanilla.

IMG_1817

In a separate bowl, combine all your dry ingredients (flour, salt, soda, powder). Begin slowly folding the dry into your wet mixture until fully combined.

IMG_1819

IMG_1821

IMG_1822

Line a cookie sheet with parchment. Combine 1/4 c white sugar and 1/4 c brown sugar in a small bowl with enough surface area for covering your dough balls. Begin scooping and rolling your dough into spheres the size of ping pong balls, roll your ball in sugar so that it’s completely covered.

IMG_1823

IMG_1827

Once your sheet is full, bake for 8-12 minutes. You want to take these cookies out on the rarer side as they’ll firm quite a bit as they cool. The center of the cookie tastes like chewy, salted caramel. The cookies are sturdy, stack well, and would be mean bookends to an ice cream sandwich.

IMG_1828

Get baking!

xoxo,
Julia

key lime pie

KeyLimePie

This Hungry Texan celebrated the Fourth of July in the Houston homeland with the Lovett clan. We feasted on a red, white, and boil of tasty crustaceans and satiated our sweet teeth post-Fireworks with this sweet and tangy key lime pie.

When life gives you limes, make key lime pie!


KeyLimeCrust Ingredients

Key lime crust:
1 1/2 cups graham cracker crumbs
1/2 cup brown sugar
6 tbl melted butter
2 tbl lime zest

KeyLime Filling

Key lime filling:
4 egg yolks
3 tbl lime zest (from 4 key limes)
1/2 cup lime juice
1 can sweetened condensed milk

This is a one bowl, one whisk pie that requires minimal baking. For your crust, combine graham cracker crumbs, brown sugar, zest and melted butter in a large bowl until it sticks together like wet sand.

MixingCrust

Spray the bottom of a 9-inch pie plate with your preferred baking spray and pack your crust into the pie plate until it’s densely and compactly situated. Bake at 350 degrees for about 10-minutes or until it’s looking golden and the smells start wafting.

Crust_prebake

For your filling, whisk together 4 egg yolks for about two minutes. Add your lime zest and continue whisking until your mixture is a pale green.

Eggs + Lime

Whisk in your lime juice and condensed milk until your filling starts to thicken. Let rest for at least 20-minutes at room temperature, giving the filling adequate time to firm up. Pour filling into the cooled pie crust and return it to your 350 degree oven for 15-20 minutes or until the center of your pie is firm.

Full_Pie

Let your pie rest until it reaches room temperature and then place in the fridge to chill (can be made up to a day in advance).

Slice & serve chilled with a dollop of whipped cream and a slice of lime!

xoxo,

Julia

gluten-free peanut butter chocolate cupcakes

GF_PBChocolateCupcakes
A few weeks ago we celebrated our lovely friend Lauren’s birthday with an evening of competitive karaoke! Lauren and Boston Boy are both members of the acclaimed (champs three weeks running!) “A Tribe Called Northwest” karaoke team and the birthday festivities were full of friends, Fame, and these gluten-free peanut butter chocolate cupcakes! Now, this was this Hungry Texan’s first real go at gluten-free baking (I experimented with some almond meal baking in college…but who didn’t?!). The cake turned out light and airy with  rich chocolate flavor, and the peanut butter buttercream icing was the perfect accompaniment.

For 12 cupcakes you’ll need:

For the cake:
1 1/3 cup garbanzo flour (sifted)
3/4 + 1 tbl cups sugar
1/3 cup cocoa powder
3/4 tsp baking powder
1 tsp baking soda
1/4 tsp salt
1/4 cup olive oil
1/2 cup buttermilk
1/2 cup water

for the icing:
1 stick butter
1/4 cup peanut butter
1 tsp vanilla
1 cup powdered sugar

These cupcakes are a one bowl wonder and all you need is a fork! Start by combining all your dry ingredients (garbanzo flour, soda, powder, salt, sugar) in a large bowl. Stir to combine.

DryIngredients_GF

Then, add your wet ingredients (buttermilk, egg, water, and oil).

WetIngredients_GF

Stir until smooth and silky.

Batter_GF

This batter’s a little bit on the thin side, so I transfered my batter from a bowl into a pitcher to ensure less mess when filling my cupcake liners. Fill cupcake liners.

DSC_0788

Bake at 350 for about 25 minutes. While baking, make your icing by creaming together butter, peanut butter, vanilla & powdered sugar together in the bowl of a stand mixer.

DSC_0805

Remove cupcakes from oven and let cool completely before frosting!

DSC_0800

xoxo,

Julia

A Hungry Texans Crawfish Boil

title

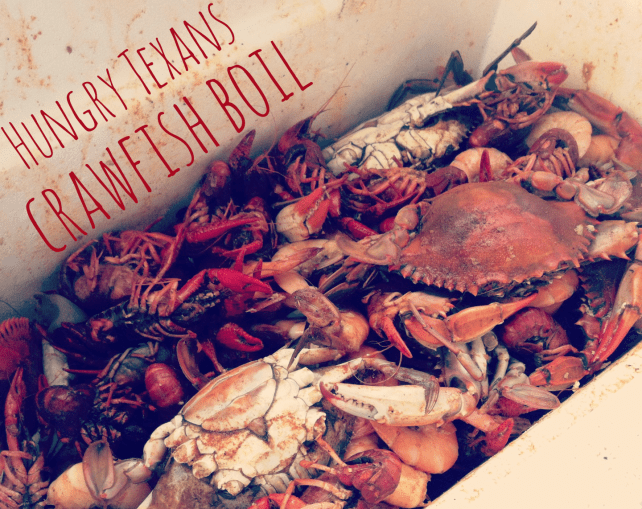
Being home in Texas means three things for certain: there will always be someone cooling off in the swimming pool, my daddy’s favorite playlist (self-titled Eggman) will always be on the outdoor speakers, and we’ll always be grubbing on the screened-in porch.  One of my favorite such grubs happens to be when we pull out the 80 quart pot, fill it with fresh seafood, and enjoy a good old-fashioned crawfish boil.  Blue crabs, Gulf shrimp, Louisiana Crawfish- all perfectly seasoned and served with sweet corn and potatoes to soak up the spice.  There’s really no better way to spend a Sunday afternoon with family and friends than over a steaming bowl of shelled crustaceans.  This is a pot of deliciousness that I’ll probably leave up to my dad, who humbly claims that there’s no secret to it, but has obviously mastered the art.  Still, it struck me as so simple, that anyone at home with access to a few mudbugs could recreate this Cajun delight.

boil & fish

We made our way to the Vietnamese Fish Market for our supplies.  This bustling Bissonet mainstay houses hundreds of Vietnamese staples and has a spread of fresh (usually still swimming) fish and seafood.

picking crabs

For larger Crawfish Boils with the extended family when we need huge quantities of crawfish, my dad will venture out to Beaumont (about 45 minutes from Houston) for a surplus batch.  But to feed 6 people, you can manage with a more local supermarket- you’ll need 2.5 pounds of shrimp, 10 pounds of crawfish, and 6 crabs.

You’ll need
2 to 3 lbs Gulf Shrimp, heads off
10 lbs Crawfish, still kickin’
6 blue crabs, alive and plump
½ bag (3 cups) Crawfish Boil
4 lemons, cut in half
1 stick butter
5 lbs red potatoes
6 ears sweet corn

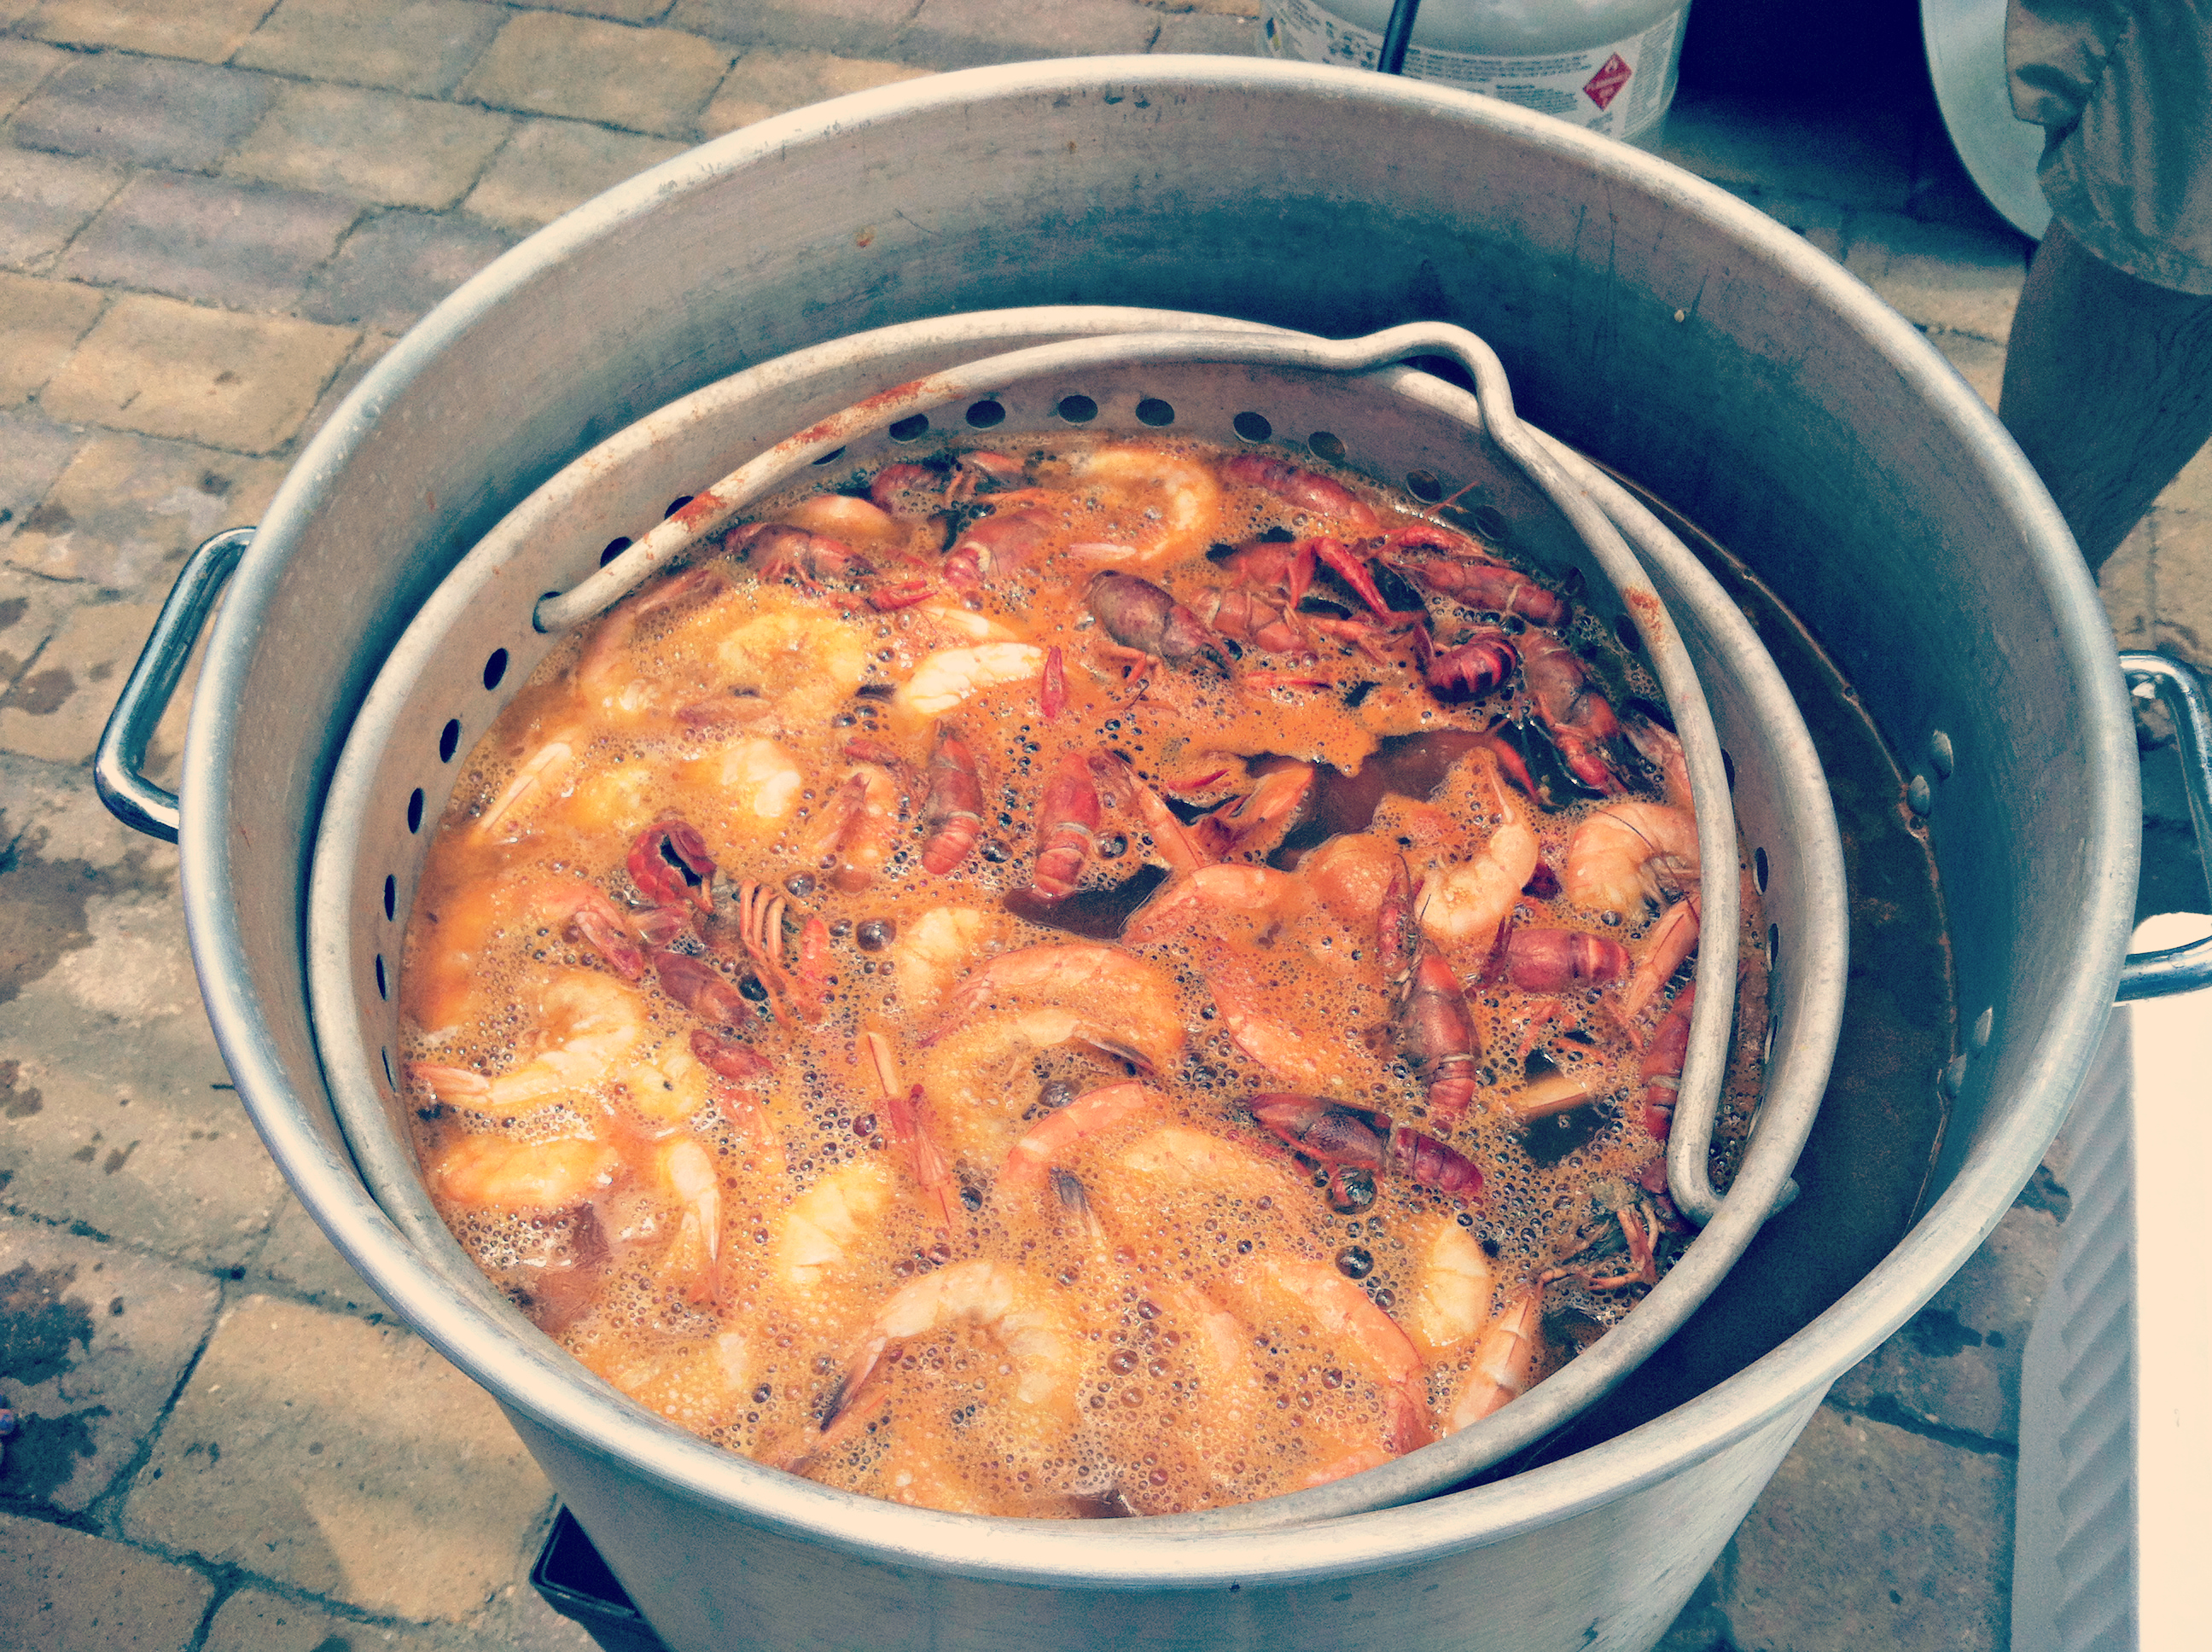
Fill the crawfish pot 2/3 of the way with water and bring to a boil.  Add your seasoning, lemons, and butter.  Let the seasoned water come together for about 5 minutes, then carefully remove the inner basket.

daddy with crawfish

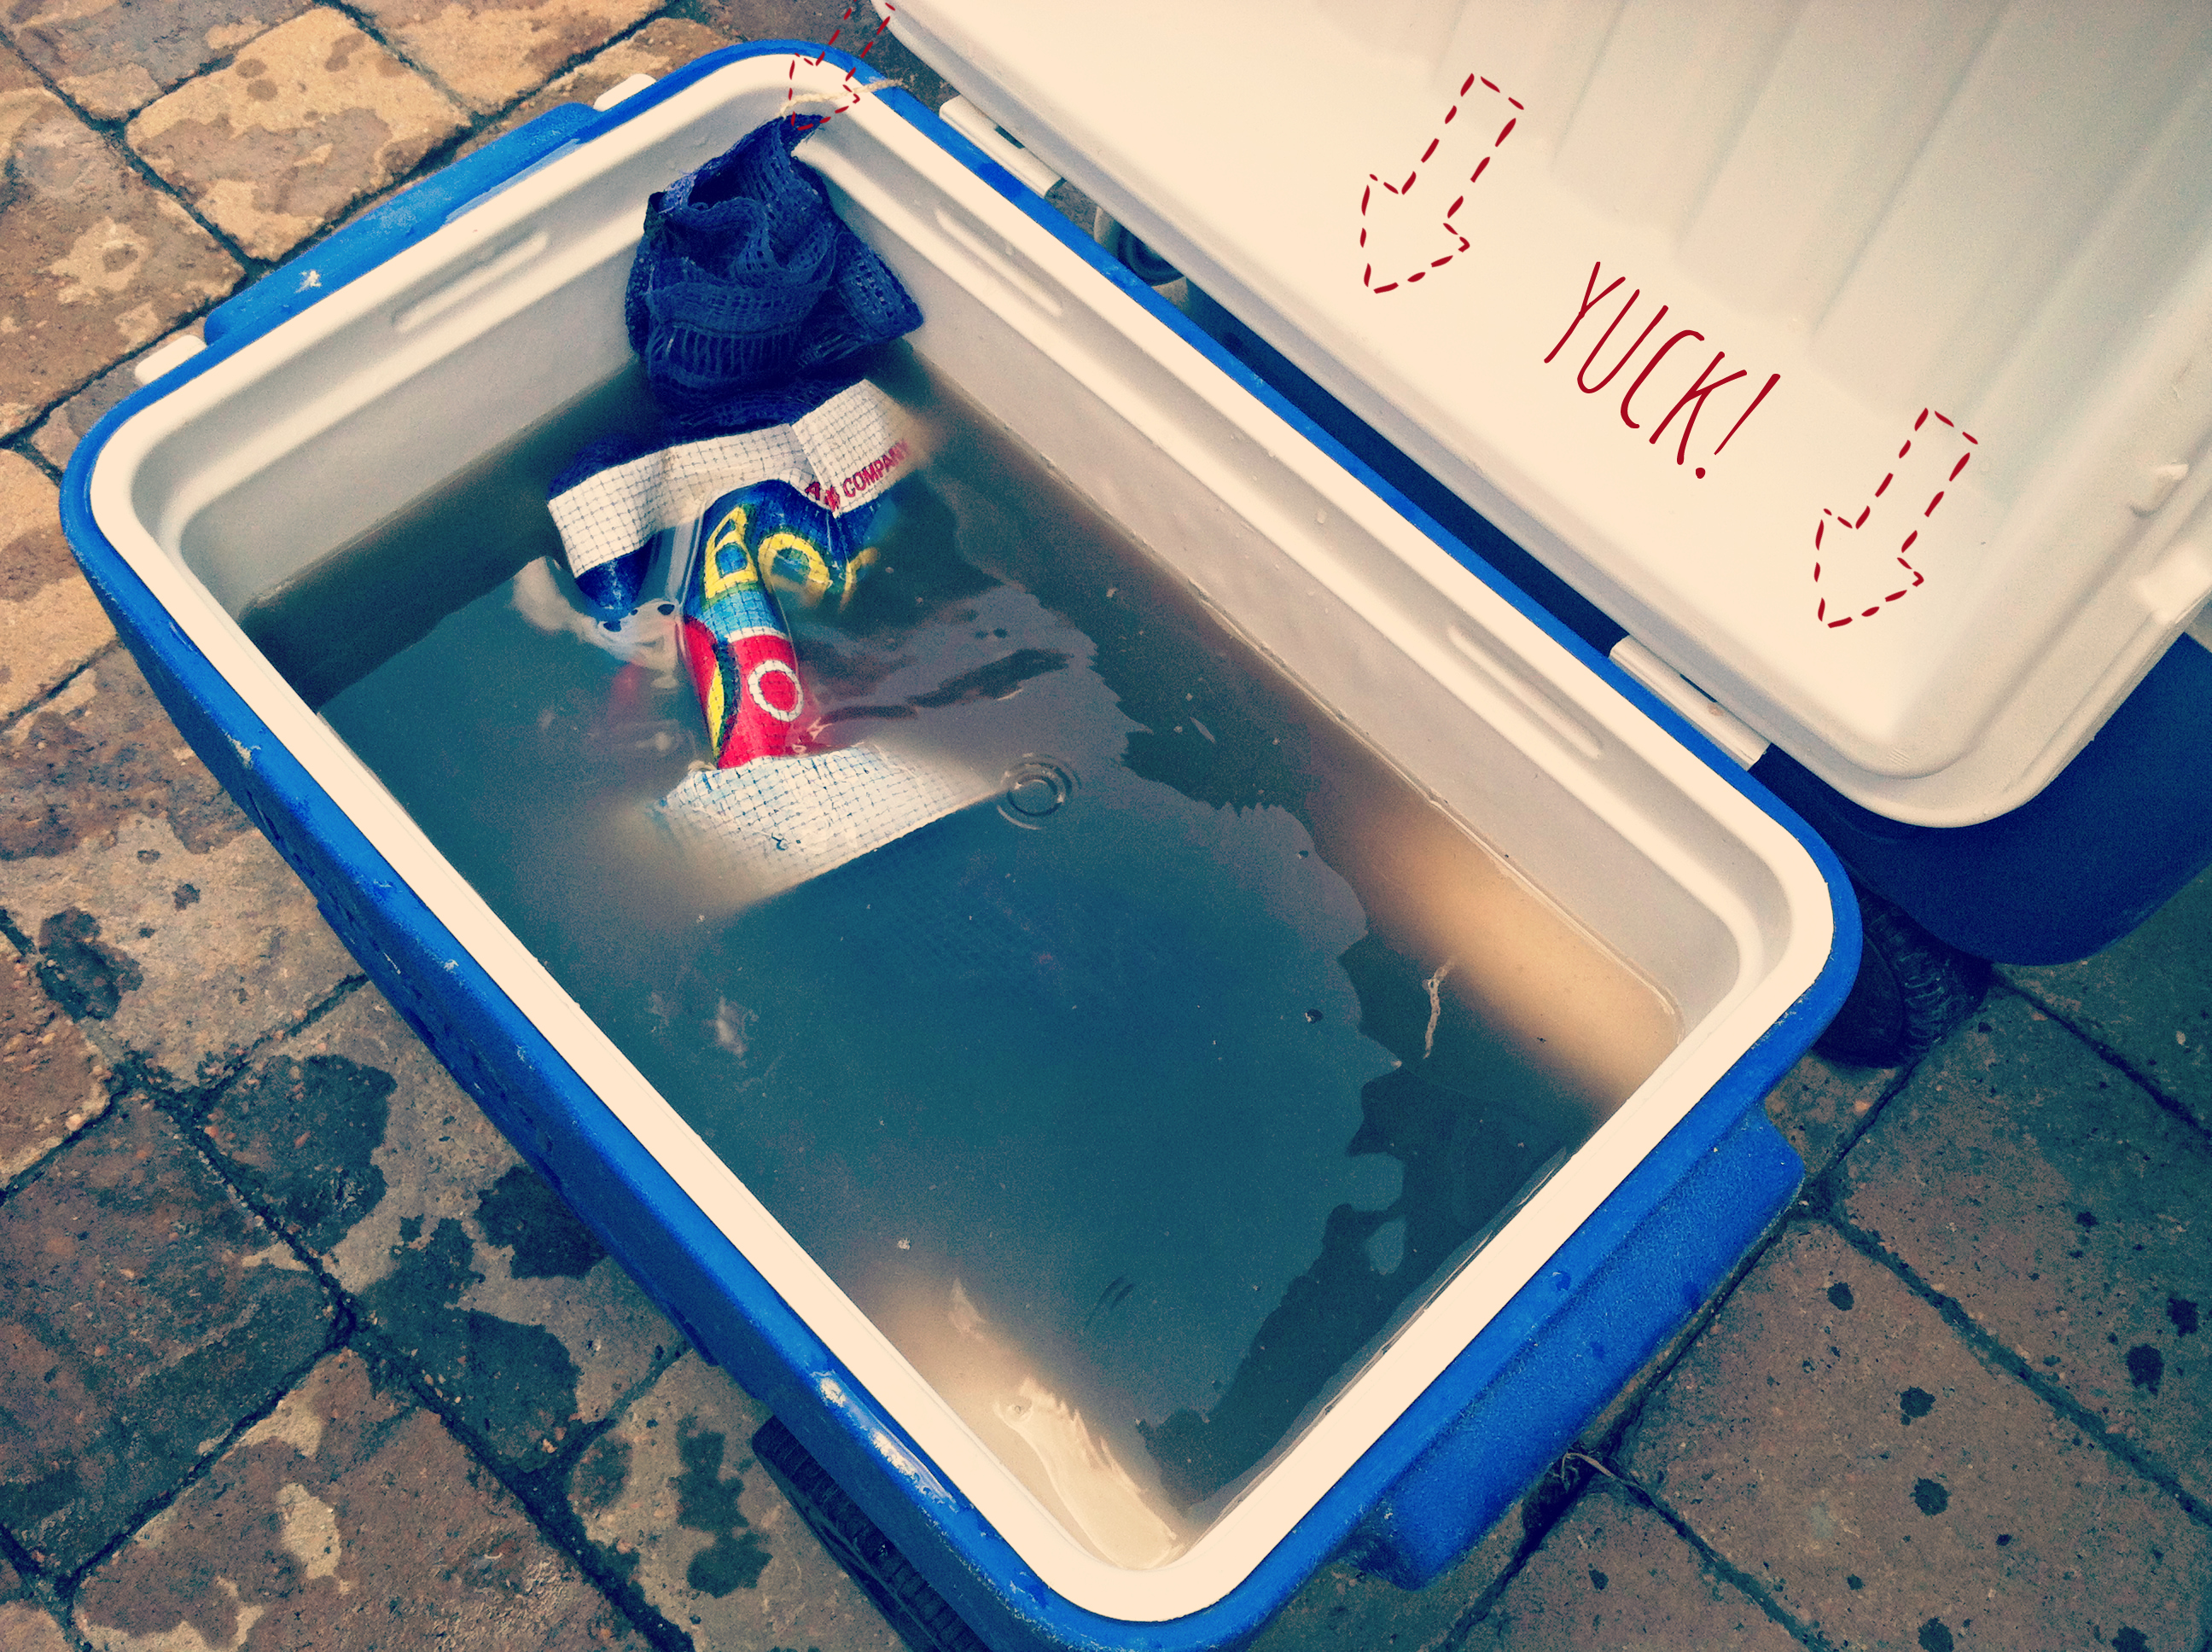
If your crawfish need to be purged, be sure to do so!  Fill a bucket (or cooler) with cold, very salty water, and add your un-purged crawfish.  Let them sit in the purging water for about 10 minutes before tossing them in the pot.

purging

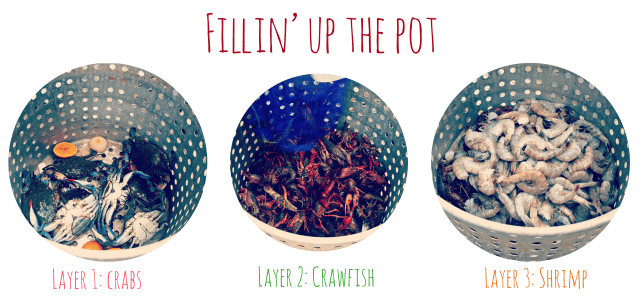
Fill the basket with your crawfish, crabs and shrimp.

fillin up the pot

Carefully lower the basket of seafoody goodness into the pot, and cover.

all boiling


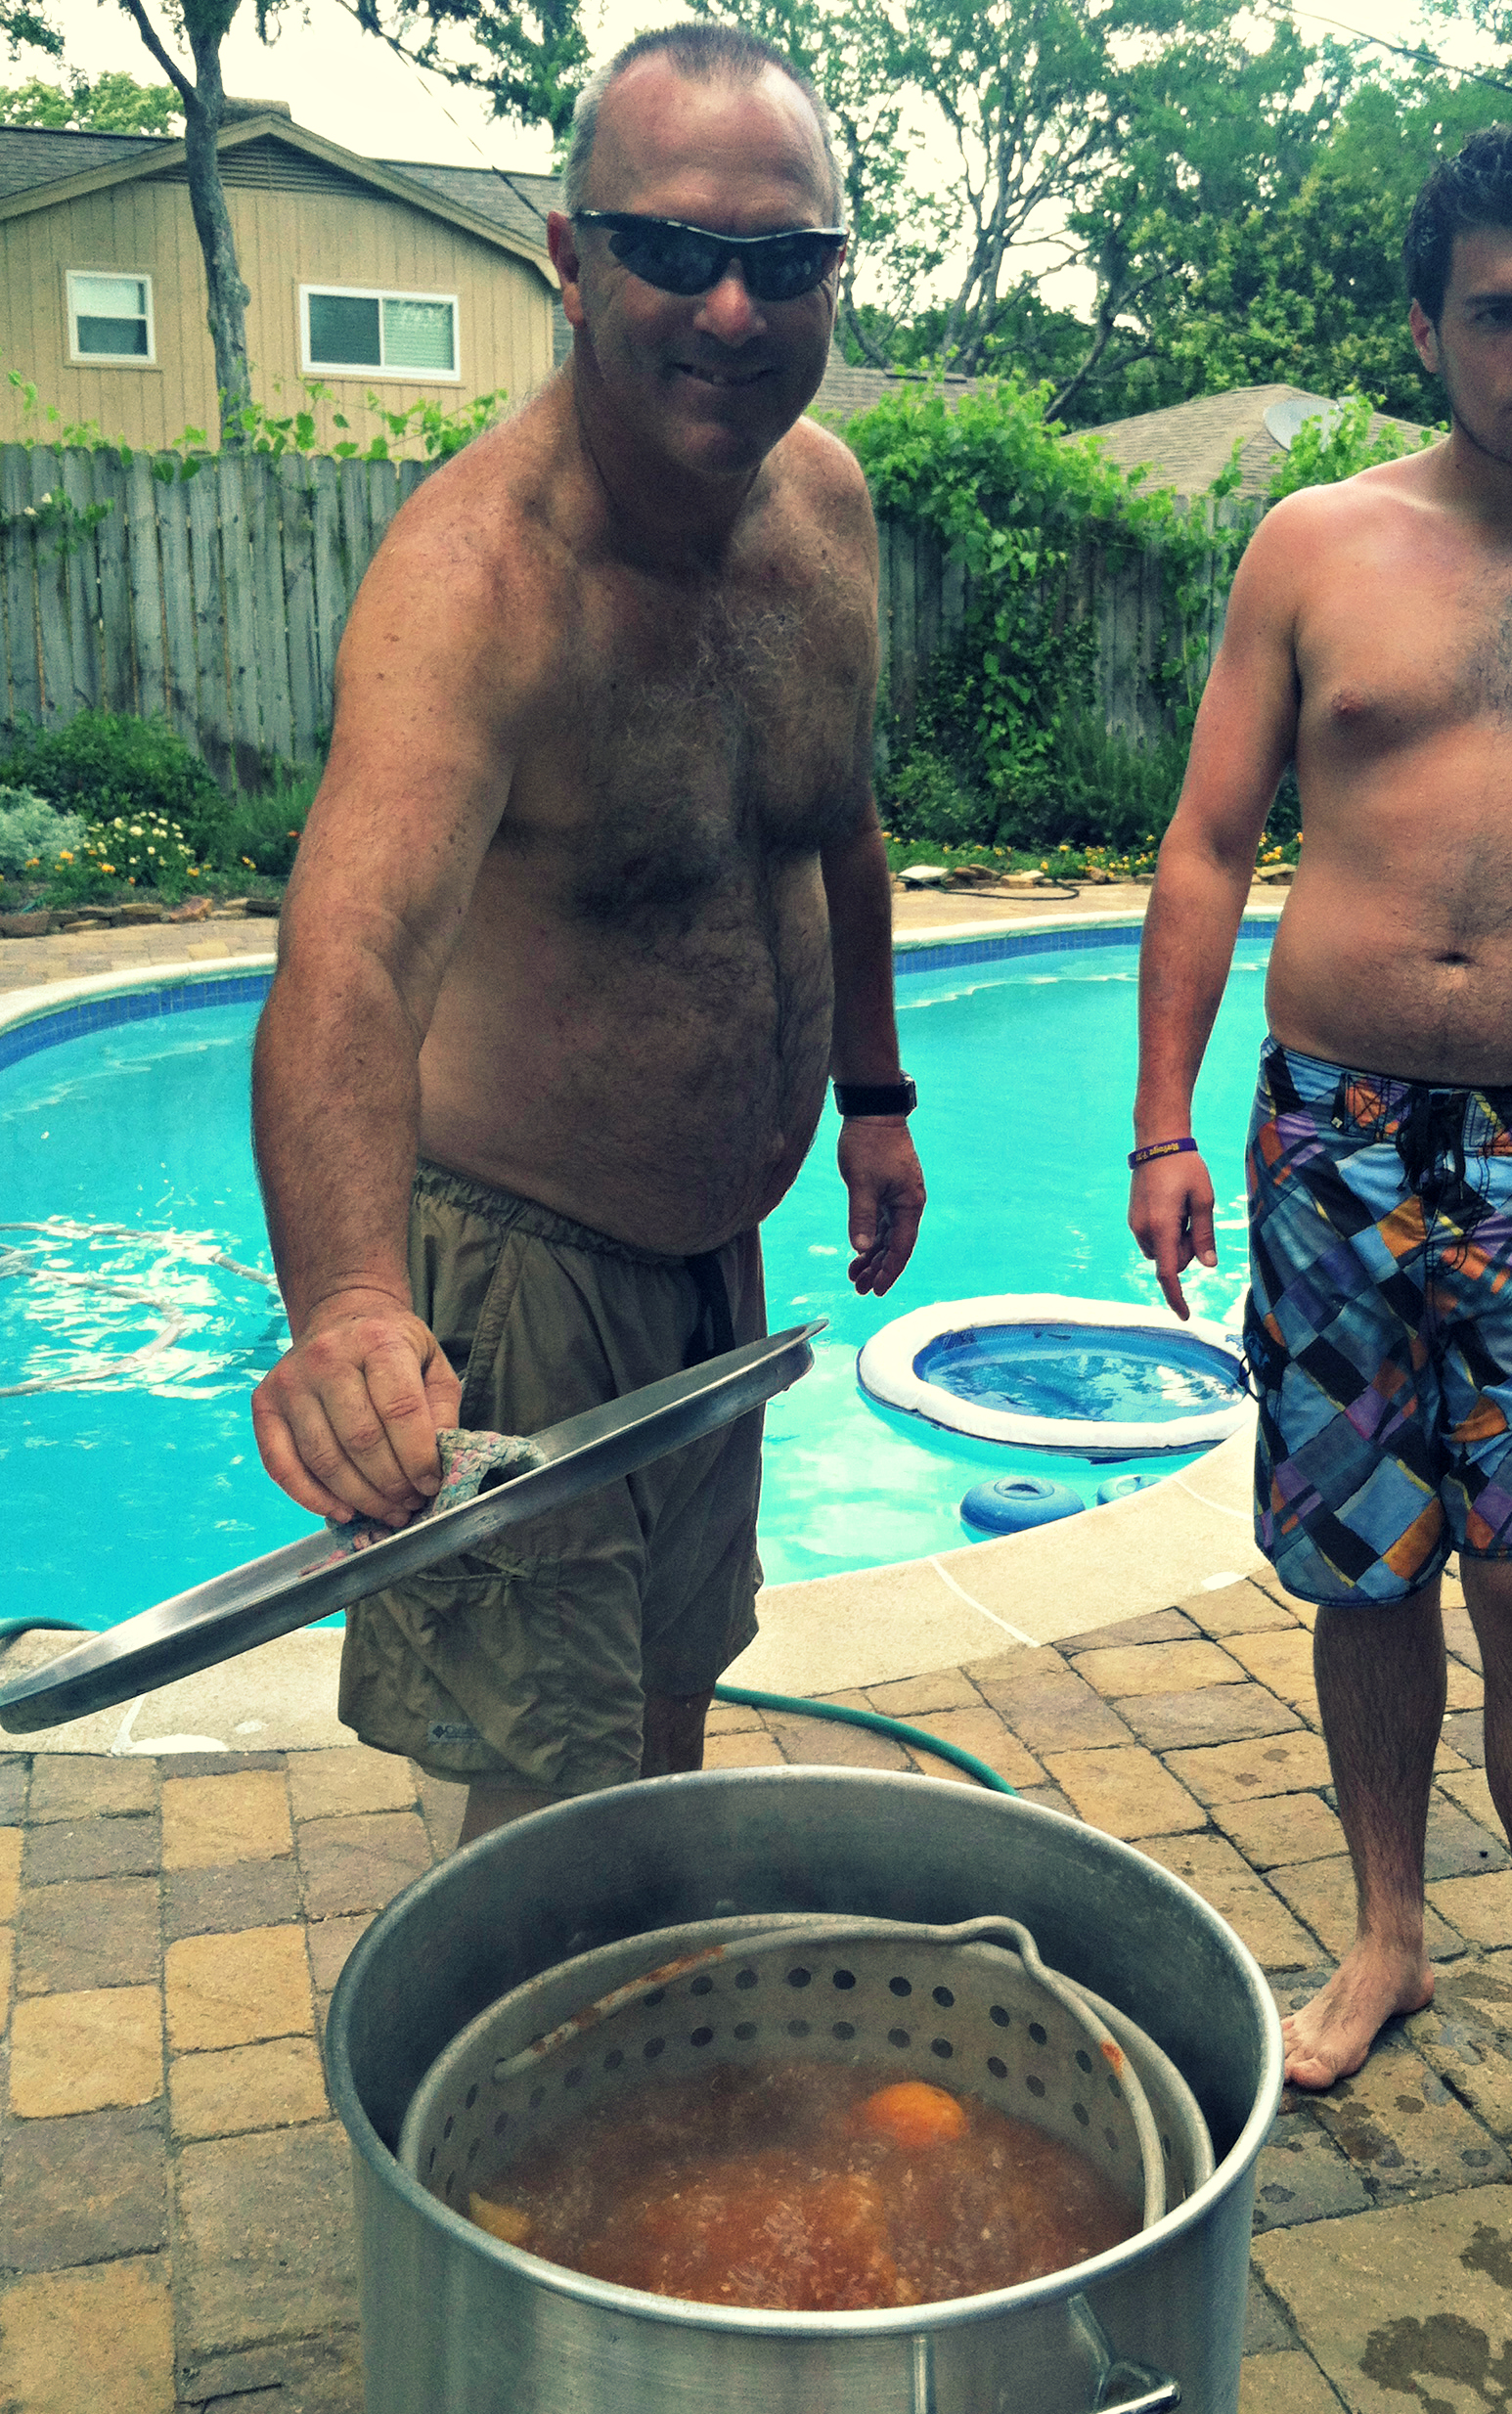
Let the pot boil for 7-10 minutes, then remove (enlist the help of 3-4 strong gentlemen) and pour your drained boil into a cooler.  Toss the crawdads with as much seasoning as you like/can handle (we used ~1/4 cup) and laissez le bon temps rouler!  You can pour ice over the seafood to cool it off before peeling.

In a separate large pot of boiling, salted water, cook your potatoes and sweet corn ~30 minutes, until potatoes are fork tender.  If you are brave, you can plop those potatoes and corn right in with the crawfish, but it will light you up, so take caution.

Drain your potatoes and corn, toss with salt and pepper, and throw the whole mess out on a newspaper-covered table so that everyone can dig in.  Or be a tad more civilized and serve the seafood in bowls.

finished product

Just be sure to have plenty of wet napkins lying around to towel off, a few trashcans strewn about to make cleanup easy, and remember- never touch your eyes!

Happy Peeling!
Liz

buttermilk ice cream

ButtermilkIceCream

I was so excited to dust off my ice cream maker last weekend for the first batch of the summer! Big Daddy and I first enjoyed buttermilk ice cream at Restaurant Nora a few years ago, and I was so smitten with the unique flavor that I was quick to attempt to recreate it a few weeks later. This buttermilk ice cream is creamy with a refreshing tang from the buttermilk and makes the perfect accompaniment for your summery cakes and cobblers (or will steal the show as a standalone scoop)!

Borrowed from Smitten Kitchen, you’ll need:

ButtermilkIceCreamIngredients

2 cups heavy cream
1 1/4 cup sugar
10 large egg yolks
2 cups buttermilk
2 teaspoons vanilla
Pinch of salt

Start by whisking together your egg yolks and 1/4 cup of sugar. Then combine cream & one cup of sugar in a medium-sized pot and bring to a simmer.

Custard1_Steps

Gradually, pour your hot cream mixture into the eggs gradually tempering them (you don’t want scrambies!). Return your creamy, eggy, sugary mixture to the heat.

Custard2_steps

Stir continuously until your mixture just starts to slowly bubble as a thick custard that coats the back of a spoon.

Custard3_steps

Remove custard from heat and stir in your pinch of salt, vanilla, and buttermilk.

Custard4_steps

Let mixture cool completely and then chill until ready to freeze & churn in your ice cream maker.

I scream, you scream, we all scream for ice cream!

xoxo,

Julia

lemony pea toasts


LemonyPeaToasts

I imagine many readers’ childhoods were filled with dinner table commands, “Eat your peas!” Not this girl. It helps when your own mother never overcame her childhood trauma of peas. Because Mommy Cat has such an intense aversion to ’em, green peas were always absent from the Lovett dinner table and for years I assumed I’d hate them too! When I finally gave peas a chance, I was delighted by their texture and fun burst of fresh flavor.

This lemony pea mash on toasts makes an easy peasy app, and the lemony pea mash would make a scrumptious spread for a veggie sandwich (I’m dreaming of a goat cheese, lemony pea mash, avocado, and sprouts concoction). 

DSC_0736

2 loaves of crusty bread, sliced (we used ciabatta)
olive oil for drizzling on sliced bread
1 2-cup bag of frozen peas, thawed
1 tbs olive oil
4 cloves of garlic smashed
2 tbs lemon
2 tbs chives
1/4 c parsley (I used the squeeze parsley for the first time! amazing!)
1/4 tsp crushed red pepper
salt to taste

In a large pan, heat olive oil, garlic, parsley and chives. Add your peas and squeeze in your lemon. Add red pepper and salt to taste. Heat mixture until your peas are thoroughly cooked, but before they’re too mushy.

DSC_0739

Pour pea mixture into your food processor and give it about 8 good pulses – I wanted to maintain some semblance of pea texture so opted for a coarse mash over a pea puree – but do whatever floats your boat.

DSC_0741

Slice (or solicit a sous chef, thanks One Sock Wonder!) your bread to desired width – I recommend ~1/2 inch – and generously drizzle on olive oil and toast.

Heap room temperature pea mash onto toasts and enjoy!

Peas out,

Julia